RailsでMySQL導入、絵文字対応させる
rails new
rails newして新たなアプリケーションを作成しようとしたら、指定したrailsのgemがないというエラーが出ました。
$ rails _6.1.3.1_ new sample --database=mysql --skip-test
Traceback (most recent call last):
    2: from /Users/SAYO/.rbenv/versions/2.5.1/bin/rails:23:in `<main>'
    1: from /Users/SAYO/.rbenv/versions/2.5.1/lib/ruby/site_ruby/2.5.0/rubygems.rb:300:in `activate_bin_path'
/Users/SAYO/.rbenv/versions/2.5.1/lib/ruby/site_ruby/2.5.0/rubygems.rb:281:in `find_spec_for_exe': can't find gem railties (= 6.1.3.1) with executable rails (Gem::GemNotFoundException)
このエラーを解決するために、railsのgemをインストールしました。
$ gem install rails -v 6.1.3.1
Fetching activesupport-6.1.3.1.gem
Fetching actionview-6.1.3.1.gem
Fetching actionpack-6.1.3.1.gem
Fetching railties-6.1.3.1.gem
Fetching activerecord-6.1.3.1.gem
Fetching activemodel-6.1.3.1.gem
Fetching activejob-6.1.3.1.gem
Fetching activestorage-6.1.3.1.gem
Fetching rails-6.1.3.1.gem
Fetching actiontext-6.1.3.1.gem
Fetching actionmailer-6.1.3.1.gem
Fetching actionmailbox-6.1.3.1.gem
Fetching actioncable-6.1.3.1.gem
Successfully installed activesupport-6.1.3.1
Successfully installed actionview-6.1.3.1
Successfully installed actionpack-6.1.3.1
Successfully installed railties-6.1.3.1
Successfully installed activemodel-6.1.3.1
Successfully installed activerecord-6.1.3.1
Successfully installed activejob-6.1.3.1
Successfully installed activestorage-6.1.3.1
Successfully installed actiontext-6.1.3.1
Successfully installed actionmailer-6.1.3.1
Successfully installed actionmailbox-6.1.3.1
Successfully installed actioncable-6.1.3.1
Successfully installed rails-6.1.3.1
Parsing documentation for activesupport-6.1.3.1
Installing ri documentation for activesupport-6.1.3.1
Parsing documentation for actionview-6.1.3.1
Installing ri documentation for actionview-6.1.3.1
Parsing documentation for actionpack-6.1.3.1
Installing ri documentation for actionpack-6.1.3.1
Parsing documentation for railties-6.1.3.1
Installing ri documentation for railties-6.1.3.1
Parsing documentation for activemodel-6.1.3.1
Installing ri documentation for activemodel-6.1.3.1
Parsing documentation for activerecord-6.1.3.1
Installing ri documentation for activerecord-6.1.3.1
Parsing documentation for activejob-6.1.3.1
Installing ri documentation for activejob-6.1.3.1
Parsing documentation for activestorage-6.1.3.1
Installing ri documentation for activestorage-6.1.3.1
Parsing documentation for actiontext-6.1.3.1
Installing ri documentation for actiontext-6.1.3.1
Parsing documentation for actionmailer-6.1.3.1
Installing ri documentation for actionmailer-6.1.3.1
Parsing documentation for actionmailbox-6.1.3.1
Installing ri documentation for actionmailbox-6.1.3.1
Parsing documentation for actioncable-6.1.3.1
Installing ri documentation for actioncable-6.1.3.1
Parsing documentation for rails-6.1.3.1
Installing ri documentation for rails-6.1.3.1
Done installing documentation for activesupport, actionview, actionpack, railties, activemodel, activerecord, activejob, activestorage, actiontext, actionmailer, actionmailbox, actioncable, rails after 28 seconds
13 gems installed
そしてもう一度rails newします。データベースにMySQLを指定します。
$ rails _6.1.3.1_ new sample --database=mysql --skip-test
$ cd sample/
$ bundle install
Fetching gem metadata from https://rubygems.org/............
Resolving dependencies....
Using rake 13.0.3
Using concurrent-ruby 1.1.8
Using minitest 5.14.4
Using racc 1.5.2
Using crass 1.0.6
Using rack 2.2.3
Using nio4r 2.5.7
Using websocket-extensions 0.1.5
Using marcel 1.0.1
Using mini_mime 1.0.3
Using bindex 0.8.1
Using msgpack 1.4.2
Using bundler 2.2.16
Using byebug 11.1.3
Using ffi 1.15.0
Using rb-fsevent 0.11.0
Using method_source 1.0.0
Using zeitwerk 2.4.2
Using thor 1.1.0
Using tilt 2.0.10
Using semantic_range 3.0.0
Using spring 2.1.1
Using turbolinks-source 5.2.0
Using i18n 1.8.10
Using tzinfo 2.0.4
Using nokogiri 1.11.4 (x86_64-darwin)
Using rack-test 1.1.0
Using rack-mini-profiler 2.3.2
Using rack-proxy 0.6.5
Using sprockets 4.0.2
Using websocket-driver 0.7.3
Using puma 5.3.1
Using mail 2.7.1
Using bootsnap 1.7.5
Using rb-inotify 0.10.1
Using sassc 2.4.0
Using turbolinks 5.2.1
Using activesupport 6.1.3.2
Using loofah 2.9.1
Using listen 3.5.1
Using rails-dom-testing 2.0.3
Using globalid 0.4.2
Using activemodel 6.1.3.2
Using jbuilder 2.11.2
Using rails-html-sanitizer 1.3.0
Using activejob 6.1.3.2
Using activerecord 6.1.3.2
Fetching mysql2 0.5.3
Using builder 3.2.4
Using erubi 1.10.0
Using actionview 6.1.3.2
Using actionpack 6.1.3.2
Using actioncable 6.1.3.2
Using activestorage 6.1.3.2
Using sprockets-rails 3.2.2
Using actionmailer 6.1.3.2
Using railties 6.1.3.2
Using actionmailbox 6.1.3.2
Using sassc-rails 2.1.2
Using webpacker 5.4.0
Using sass-rails 6.0.0
Using web-console 4.1.0
Using actiontext 6.1.3.2
Using rails 6.1.3.2
Installing mysql2 0.5.3 with native extensions
Gem::Ext::BuildError: ERROR: Failed to build gem native extension.

    current directory: /Users/SAYO/.rbenv/versions/2.5.1/lib/ruby/gems/2.5.0/gems/mysql2-0.5.3/ext/mysql2
/Users/SAYO/.rbenv/versions/2.5.1/bin/ruby -I /Users/SAYO/.rbenv/versions/2.5.1/lib/ruby/site_ruby/2.5.0 -r ./siteconf20210519-27070-xoi5mn.rb extconf.rb
checking for rb_absint_size()... yes
checking for rb_absint_singlebit_p()... yes
checking for rb_wait_for_single_fd()... yes
-----
Using mysql_config at /usr/local/opt/mysql@5.7/bin/mysql_config
-----
checking for mysql.h... yes
checking for errmsg.h... yes
checking for SSL_MODE_DISABLED in mysql.h... yes
checking for SSL_MODE_PREFERRED in mysql.h... yes
checking for SSL_MODE_REQUIRED in mysql.h... yes
checking for SSL_MODE_VERIFY_CA in mysql.h... yes
checking for SSL_MODE_VERIFY_IDENTITY in mysql.h... yes
checking for MYSQL.net.vio in mysql.h... yes
checking for MYSQL.net.pvio in mysql.h... no
checking for MYSQL_ENABLE_CLEARTEXT_PLUGIN in mysql.h... yes
checking for SERVER_QUERY_NO_GOOD_INDEX_USED in mysql.h... yes
checking for SERVER_QUERY_NO_INDEX_USED in mysql.h... yes
checking for SERVER_QUERY_WAS_SLOW in mysql.h... yes
checking for MYSQL_OPTION_MULTI_STATEMENTS_ON in mysql.h... yes
checking for MYSQL_OPTION_MULTI_STATEMENTS_OFF in mysql.h... yes
checking for my_bool in mysql.h... yes
-----
Don't know how to set rpath on your system, if MySQL libraries are not in path mysql2 may not load
-----
-----
Setting libpath to /usr/local/opt/mysql@5.7/lib
-----
creating Makefile

current directory: /Users/SAYO/.rbenv/versions/2.5.1/lib/ruby/gems/2.5.0/gems/mysql2-0.5.3/ext/mysql2
make DESTDIR\= clean

current directory: /Users/SAYO/.rbenv/versions/2.5.1/lib/ruby/gems/2.5.0/gems/mysql2-0.5.3/ext/mysql2
make DESTDIR\=
compiling client.c
compiling infile.c
compiling mysql2_ext.c
compiling result.c
compiling statement.c
linking shared-object mysql2/mysql2.bundle
ld: library not found for -lssl
clang: error: linker command failed with exit code 1 (use -v to see invocation)
make: *** [mysql2.bundle] Error 1

make failed, exit code 2

Gem files will remain installed in /Users/SAYO/.rbenv/versions/2.5.1/lib/ruby/gems/2.5.0/gems/mysql2-0.5.3 for inspection.
Results logged to /Users/SAYO/.rbenv/versions/2.5.1/lib/ruby/gems/2.5.0/extensions/x86_64-darwin-20/2.5.0/mysql2-0.5.3/gem_make.out

An error occurred while installing mysql2 (0.5.3), and Bundler cannot continue.
Make sure that `gem install mysql2 -v '0.5.3' --source 'https://rubygems.org/'` succeeds before bundling.

In Gemfile:
  mysql2
bundle installを実行したらエラーが発生しました。なので下記のコマンドを実行しました。
$ bundle config --local build.mysql2 "--with-ldflags=-L/usr/local/opt/openssl/lib"
$ bundle install
このコマンドでMySQLのgemをインストールすることができました。
参考 : bundle installでmysql2がエラーになる件 - Qiita
config/database.ymlを確認すると以下のようになっています。
default: &default
  adapter: mysql2
  encoding: utf8mb4
  pool: <%= ENV.fetch("RAILS_MAX_THREADS") { 5 } %>
  username: root
  password:
  host: localhost

development:
  <<: *default
  database: sample_development

test:
  <<: *default
  database: sample_test

production:
  <<: *default
  database: sample_production
  username: sample
  password: <%= ENV['SAMPLE_DATABASE_PASSWORD'] %>
上記のdatabase.ymlにパスワード等を入れれば使えるようになりますが、パスワードをGitHubで管理するのはとても危険なので、環境変数として管理します。そのためにGemfileにdotenvを導入してbundle installします。
gem 'dotenv-rails'
そしてアプリケーションのルートディレクトリに.envファイルを追加します。
$ touch .env
この作成した.envファイルに以下のように記述することでRailsアプリからMySQLと接続可能になります。
DATABASE_DEV_PASSWORD=設定したパスワード
この時に、.gitignoreに下記のように.envを追加しておかないとプッシュした時にパスワード等が結局晒されることになるので注意が必要です。
/.env
DBを生成する前に絵文字をDBに保存することができるに設定しておきます。config/database.ymlファイルを下記のように編集します。
default: &default
  adapter: mysql2
  encoding: utf8mb4
  charset: utf8mb4
  collation: utf8mb4_unicode_ci
  pool: <%= ENV.fetch("RAILS_MAX_THREADS") { 5 } %>
  username: root
  password: <%= ENV['DATABASE_DEV_PASSWORD'] %>
  host: localhost
そしてここまでの設定を行ったらDBを生成していきます。
$ bundle exec rails db:create
Can't connect to local MySQL server through socket '/tmp/mysql.sock' (2)
Couldn't create 'sample_development' database. Please check your configuration.
rails aborted!
ActiveRecord::ConnectionNotEstablished: Can't connect to local MySQL server through socket '/tmp/mysql.sock' (2)
/Users/SAYO/workspace/portfolio/sample/sample/bin/rails:5:in `<top (required)>'
/Users/SAYO/workspace/portfolio/sample/sample/bin/spring:10:in `require'
/Users/SAYO/workspace/portfolio/sample/sample/bin/spring:10:in `block in <top (required)>'
/Users/SAYO/workspace/portfolio/sample/sample/bin/spring:7:in `tap'
/Users/SAYO/workspace/portfolio/sample/sample/bin/spring:7:in `<top (required)>'

Caused by:
Mysql2::Error::ConnectionError: Can't connect to local MySQL server through socket '/tmp/mysql.sock' (2)
/Users/SAYO/workspace/portfolio/sample/sample/bin/rails:5:in `<top (required)>'
/Users/SAYO/workspace/portfolio/sample/sample/bin/spring:10:in `require'
/Users/SAYO/workspace/portfolio/sample/sample/bin/spring:10:in `block in <top (required)>'
/Users/SAYO/workspace/portfolio/sample/sample/bin/spring:7:in `tap'
/Users/SAYO/workspace/portfolio/sample/sample/bin/spring:7:in `<top (required)>'
Tasks: TOP => db:create
(See full trace by running task with --trace)
エラーが発生してしまいました。ActiveRecord::ConnectionNotEstablished: Can't connect to local MySQL server through socket '/tmp/mysql.sock'
MySQLにログインしたらエラー解消するかなと思ったので、ログインしました。
$  brew services start mysql@5.7
==> Successfully started `mysql@5.7` (label: homebrew.mxcl.mysql@5.7)
MySQLにログインしてからDBを生成してみました。
$ bundle exec rails db:create
Created database 'sample_development'
Created database 'sample_test'
無事DBを作成することができたので、DBを起動させてみました。
$ rails db
Enter password:
Welcome to the MySQL monitor.  Commands end with ; or \g.
Your MySQL connection id is 8
Server version: 5.7.34 Homebrew

Copyright (c) 2000, 2021, Oracle and/or its affiliates.

Oracle is a registered trademark of Oracle Corporation and/or its
affiliates. Other names may be trademarks of their respective
owners.

Type 'help;' or '\h' for help. Type '\c' to clear the current input statement.

mysql>
DBの文字コードを表示させます。
mysql> show variables like '%char%';
+--------------------------+----------------------------------------------------------+
| Variable_name            | Value                                                    |
+--------------------------+----------------------------------------------------------+
| character_set_client     | utf8mb4                                                  |
| character_set_connection | utf8mb4                                                  |
| character_set_database   | utf8mb4                                                  |
| character_set_filesystem | binary                                                   |
| character_set_results    | utf8mb4                                                  |
| character_set_server     | utf8                                                     |
| character_set_system     | utf8                                                     |
| character_sets_dir       | /usr/local/Cellar/mysql@5.7/5.7.34/share/mysql/charsets/ |
+--------------------------+----------------------------------------------------------+
8 rows in set (0.05 sec)
rails sでサーバーを起動すると、このようなエラーが発生。
Webpacker configuration file not found /Users/SAYO/workspace/portfolio/sample/sample/config/webpacker.yml.
Please run rails webpacker:install Error: No such file or directory @ realpath_rec - /Users/SAYO/workspace/portfolio/sample/sample/config/webpacker.yml (RuntimeError)
言われた通りにrails webpacker:installをしました。これでwebpackerをインストールすることができました。これでrails sのコマンドを打つとlocalhost:3000起動しました。
絵文字が対応するか確認するためにscafoldを使って簡単な投稿機能を作ってみます。
$ rails g scaffold post title:string body:text
Running via Spring preloader in process 31797
      invoke  active_record
      create    db/migrate/20210519133059_create_posts.rb
      create    app/models/post.rb
      invoke  resource_route
       route    resources :posts
      invoke  scaffold_controller
      create    app/controllers/posts_controller.rb
      invoke    erb
      create      app/views/posts
      create      app/views/posts/index.html.erb
      create      app/views/posts/edit.html.erb
      create      app/views/posts/show.html.erb
      create      app/views/posts/new.html.erb
      create      app/views/posts/_form.html.erb
      invoke    resource_route
      invoke    helper
      create      app/helpers/posts_helper.rb
      invoke    jbuilder
      create      app/views/posts/index.json.jbuilder
      create      app/views/posts/show.json.jbuilder
      create      app/views/posts/_post.json.jbuilder
      invoke  assets
      invoke    scss
      create      app/assets/stylesheets/posts.scss
      invoke  scss
      create    app/assets/stylesheets/scaffolds.scss
投稿管理するテーブルをデータベースに作成します。
$ rails db:migrate
== 20210519133059 CreatePosts: migrating ======================================
-- create_table(:posts)
   -> 0.0791s
== 20210519133059 CreatePosts: migrated (0.0792s) =============================
そして一度サーバーを起動し直します。そしてlocalhost:3000/postsにアクセスすると投稿ページが作成されました。
TitleとBodyに絵文字をつけてフォームで送ることができました。MySQLではどのように保存されているのか確認してみます。$ rails dbでMySQLを開いてpostsテーブルの情報を表示させました。
mysql> select * from posts; +----+---------------+------+----------------------------+----------------------------+ | id | title | body | created_at | updated_at | +----+---------------+------+----------------------------+----------------------------+ | 1 | 🧚♀️ | 🐒 | 2021-05-19 13:37:23.225939 | 2021-05-19 13:37:23.225939 | +----+---------------+------+----------------------------+----------------------------+ 1 row in set (0.00 sec)
これで絵文字対応はできたみたいです。
MySQLをインストールする
Homebrewがインストールされているかを確認。
Homebrew 3.1.7がインストールされていることが確認できました。
$ brew -v
Homebrew 3.1.7
Homebrew/homebrew-core (git revision aacf707e0e; last commit 2021-05-15)
Homebrew/homebrew-cask (git revision 9181a2ccc7; last commit 2021-05-15)
Homebrewを用いて「MySQL」をインストール。
まずmysqlのバージョンを確認すると-bash: mysql: command not foundとなったのでhomebrewにMySQLはインストールされていませんでした。なのでbrew install mysql@5.7でインストールをします。
$ mysql --version
-bash: mysql: command not found
$ brew install mysql@5.7
Updating Homebrew...
==> Auto-updated Homebrew!
Updated 3 taps (heroku/brew, homebrew/core and homebrew/cask).
==> New Formulae
clazy               gitbackup           mathlibtools        nomino
elan-init           ipinfo-cli          neovim-remote
==> Updated Formulae
Updated 223 formulae.
==> Deleted Formulae
osquery
==> New Casks
enclave                    mem                        vamiga
jgrennison-openttd         privileges
==> Updated Casks
Updated 185 casks.

==> Downloading https://ghcr.io/v2/homebrew/core/mysql/5.7/manifests/5.7.34
######################################################################## 100.0%
==> Downloading https://ghcr.io/v2/homebrew/core/mysql/5.7/blobs/sha256:baf50315
==> Downloading from https://pkg-containers.githubusercontent.com/ghcr1/blobs/sh
######################################################################## 100.0%
==> Pouring mysql@5.7--5.7.34.big_sur.bottle.tar.gz
==> /usr/local/Cellar/mysql@5.7/5.7.34/bin/mysqld --initialize-insecure --user=S
==> Caveats
We've installed your MySQL database without a root password. To secure it run:
    mysql_secure_installation

MySQL is configured to only allow connections from localhost by default

To connect run:
    mysql -uroot

mysql@5.7 is keg-only, which means it was not symlinked into /usr/local,
because this is an alternate version of another formula.

If you need to have mysql@5.7 first in your PATH, run:
  echo 'export PATH="/usr/local/opt/mysql@5.7/bin:$PATH"' >> /Users/SAYO/.bash_profile

For compilers to find mysql@5.7 you may need to set:
  export LDFLAGS="-L/usr/local/opt/mysql@5.7/lib"
  export CPPFLAGS="-I/usr/local/opt/mysql@5.7/include"

For pkg-config to find mysql@5.7 you may need to set:
  export PKG_CONFIG_PATH="/usr/local/opt/mysql@5.7/lib/pkgconfig"

To have launchd start mysql@5.7 now and restart at login:
  brew services start mysql@5.7
Or, if you don't want/need a background service you can just run:
  /usr/local/opt/mysql@5.7/bin/mysql.server start
==> Summary
🍺  /usr/local/Cellar/mysql@5.7/5.7.34: 319 files, 234.7MB
MySQLが使えるようにするための2つの初期設定。
- パスの設定
- パスワードの設定
① MySQLのインストールはできましたが、そのままではMySQL用のコマンドが使えません。これからコマンドを使えるようにするために実行ファイルの参照先を設定します。
$ echo 'export PATH="/usr/local/opt/mysql@5.7/bin:$PATH"' >> /Users/SAYO/.bash_profile
設定を反映させるために次のコマンドをターミナルで実行します。
$ source ~/.bash_profile
最後に設定が正しく完了したことを確認してみましょう。 以下のコマンドでインストールしたMySQLのバージョンが表示されればパスの設定は完了です。
$ mysql --version
mysql  Ver 14.14 Distrib 5.7.34, for osx10.16 (x86_64) using  EditLine wrapper
② パスワードの設定はMySQLが起動している時に行います。 以下のコマンドでMySQLを起動しましょう。
$ brew services start mysql@5.7
==> Successfully started `mysql@5.7` (label: homebrew.mxcl.mysql@5.7)
起動することができたら、次のコマンドをターミナルで実行してパスワードの設定します。
コマンドを実行すると最初にVALIDATE PASSWORD PLUGINという強固なパスワード設定を助けるプラグインを使用するかどうかを質問されます。今回はローカル環境のみでの使用を想定しているので、何も入力せずEnterキーを押して次に進みます。
次にrootユーザーのパスワードを設定します。
※ rootユーザーとは「管理者」のことで、全ての操作を行う権限を持った特別なユーザーです。
ここで任意のパスワードを設定することができます。この画面ではキーボードを押しても何も表示されませんが、正常に入力されていますので落ち着いて入力し、Enterキーを押してください。
$ mysql_secure_installation

Securing the MySQL server deployment.

Connecting to MySQL using a blank password.

VALIDATE PASSWORD PLUGIN can be used to test passwords
and improve security. It checks the strength of password
and allows the users to set only those passwords which are
secure enough. Would you like to setup VALIDATE PASSWORD plugin?

Press y|Y for Yes, any other key for No:
Please set the password for root here.

New password:

Re-enter new password:
By default, a MySQL installation has an anonymous user,
allowing anyone to log into MySQL without having to have
a user account created for them. This is intended only for
testing, and to make the installation go a bit smoother.
You should remove them before moving into a production
environment.

Remove anonymous users? (Press y|Y for Yes, any other key for No) :

 ... skipping.

Normally, root should only be allowed to connect from
'localhost'. This ensures that someone cannot guess at
the root password from the network.

Disallow root login remotely? (Press y|Y for Yes, any other key for No) :

 ... skipping.
By default, MySQL comes with a database named 'test' that
anyone can access. This is also intended only for testing,
and should be removed before moving into a production
environment.

Remove test database and access to it? (Press y|Y for Yes, any other key for No) :

 ... skipping.
Reloading the privilege tables will ensure that all changes
made so far will take effect immediately.

Reload privilege tables now? (Press y|Y for Yes, any other key for No) :

 ... skipping.
All done!
MySQLにログイン。
まずはMySQLを起動させます。すでに起動していたので、一応リスタートしました。
$ brew services start mysql@5.7
Service `mysql@5.7` already started, use `brew services restart mysql@5.7` to restart.
$ brew services restart mysql@5.7
Stopping `mysql@5.7`... (might take a while)
==> Successfully stopped `mysql@5.7` (label: homebrew.mxcl.mysql@5.7)
==> Successfully started `mysql@5.7` (label: homebrew.mxcl.mysql@5.7)
起動できたので次はログインをします。mysql>が表示されたら成功です。
$ mysql --user=root --password
Enter password:
Welcome to the MySQL monitor.  Commands end with ; or \g.
Your MySQL connection id is 2
Server version: 5.7.34 Homebrew

Copyright (c) 2000, 2021, Oracle and/or its affiliates.

Oracle is a registered trademark of Oracle Corporation and/or its
affiliates. Other names may be trademarks of their respective
owners.

Type 'help;' or '\h' for help. Type '\c' to clear the current input statement.

mysql>
MySQLからログアウトをするときはexit;を入力するとログアウト完了です。
mysql> exit;
Bye
作業が終わったらMySQLを停止させましょう。
$ brew services stop mysql@5.7
Stopping `mysql@5.7`... (might take a while)
==> Successfully stopped `mysql@5.7` (label: homebrew.mxcl.mysql@5.7)
simple_calendarを使ってカレンダーを実装
gemのsimple_calendarをPFで使おうかなと考えているので、PFで実装する前に練習で使用してみることにしました。
GitHub - excid3/simple_calendar: A wonderfully simple calendar gem for Rails
使用方法
まず最初にGemfileにsimple_calenderのgemを追加してbundle installしました。
gem "simple_calendar", "~> 2.4"
次にboardコントローラを作成します。
$ bundle exec rails generate controller boards index
Running via Spring preloader in process 13728
      create  app/controllers/boards_controller.rb
       route  get 'boards/index'
      invoke  erb
      create    app/views/boards
      create    app/views/boards/index.html.erb
      invoke  helper
      create    app/helpers/boards_helper.rb
      invoke  assets
      invoke    scss
      create      app/assets/stylesheets/boards.scss
class BoardsController < ApplicationController
  def index
    @boards = Board.all
  end
end
boardモデルを作成します。
$ bundle exec rails generate model board
Running via Spring preloader in process 13762
      invoke  active_record
      create    db/migrate/20210524125207_create_boards.rb
      create    app/models/board.rb
作成されたマイグレーションファイルに必要なカラムとデータ型を指定します。
class CreateBoards < ActiveRecord::Migration[6.1]
  def change
    create_table :boards do |t|
      t.string :title
      t.text :content
      t.datetime :start_time

      t.timestamps
    end
  end
end
t.datetime :start_timeこのカラムがカレンダーには必要です。日記を投稿したい日を選択するために使われます。
追記したらbundle exec rails db:migrateを行います。
$ bundle exec rails db:migrate
== 20210524125207 CreateBoards: migrating =====================================
-- create_table(:boards)
   -> 0.1614s
== 20210524125207 CreateBoards: migrated (0.1615s) ============================
カレンダーが表示されるようにビューを作成していきます。
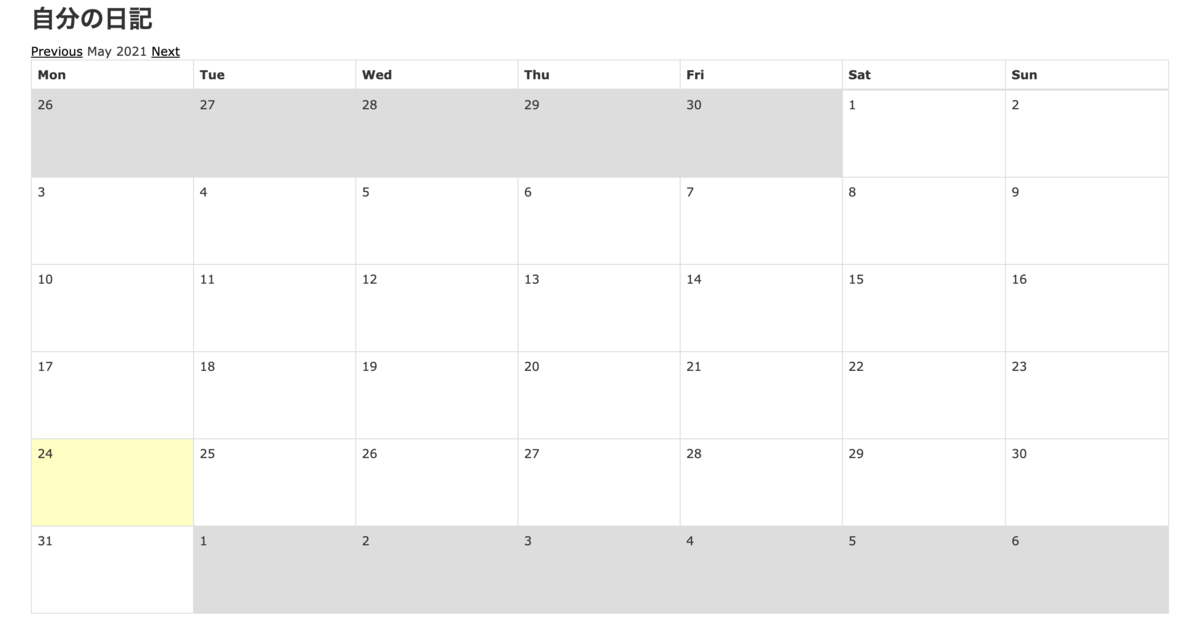
<p id="notice"><%= notice %></p>

<h1>自分の日記</h1>

<%= month_calendar events: @boards do |date, boards| %>
  <%= date.day %>
<% end %>

カレンダーのレイアウトを導入していきます。
$ bundle exec rails g simple_calendar:views
Running via Spring preloader in process 14313
      create  app/views/simple_calendar
      create  app/views/simple_calendar/_calendar.html.erb
      create  app/views/simple_calendar/_month_calendar.html.erb
      create  app/views/simple_calendar/_week_calendar.html.erb
これらの作成されたファイルを使うためにapplication.scssに下記の一番上の記述を追記します。
*= require simple_calendar
*= require_tree .
*= require_self
このままではただのカレンダーを表示するだけのページになってしまっているので、日記作成、詳細ページ、編集、削除の機能を追加していきます。
まず最初に各アクションをルーティングとコントローラに追加します。
Rails.application.routes.draw do
  resources :boards
end
class BoardsController < ApplicationController
  def index
    @boards = Board.all
  end

  def new
    @board = Board.new
  end

  def show
    @board = Board.find(params[:id])
  end

  def create
    Board.create(board_params)
    redirect_to boards_path
  end

  def destroy
    @board = Board.find(params[:id])
    @board.destroy
    redirect_to boards_path, notice:"削除しました"
  end

  def edit
    @board = Board.find(params[:id])
  end

  def update
    @board = Board.find(params[:id])
    if @board.update(board_params)
      redirect_to boards_path, notice: "編集しました"
    else
      render 'edit'
    end
  end

  private

  def board_params
    params.require(:board).permit(:title, :content, :start_time)
  end

end
次にビューを編集して表示を変えていきます。各ビューファイルを用意しました。このビューファイルの中に
$ touch app/views/boards/edit.html.erb
$ touch app/views/boards/show.html.erb
$ touch app/views/boards/new.html.erb
show.html.erb

<p id="notice"><%= notice %></p>

<p>
  <strong>タイトル</strong>
  <%= @board.title %>
</p>

<p>
  <strong>時間</strong>
  <%= @board.start_time.strftime("%Y-%m-%d %H:%M") %>
</p>

<p>
  <strong>内容</strong>
  <%= @board.content %>
</p>

<%= link_to 'Edit', edit_board_path(@board) %> |
<%= link_to 'Back', boards_path %>
new.html.erb, edit.html.erb

<%= form_with(model: @board, local: true) do |f| %>

  <div class="title">
    <%= f.label :title %>
    <%= f.text_field :title %>
  </div>

    <div class="time">
    <%= f.label :start_time %>
    <%= f.datetime_select :start_time %>
  </div>

  <div class="content">
    <%= f.label :content %>
    <%= f.text_field :content %>
  </div>

  <div class="submit">
    <%= f.submit %>
  </div>

<% end %>
index.html.erb

<p id="notice"><%= notice %></p>

<h1>自分の日記</h1>

<table>
  <thead>
    <tr>
      <th>タイトル</th>
      <th>時間</th>
      <th colspan="3"></th>
    </tr>
  </thead>

  <tbody>
    <% @boards.each do |board| %>
      <tr>
        <td><%= board.title %></td>
        <td><%= board.start_time.strftime("%Y-%m-%d %H:%M") %></td>
        <td><%= link_to 'Show', board %></td>
        <td><%= link_to 'Edit', edit_board_path(board.id) %></td>
        <td><%= link_to 'Destroy',board_path(board.id), method: :delete, data: { confirm: 'Are you sure?' } %></td>
      </tr>
    <% end %>
  </tbody>
</table>

<br>

<%= link_to '日記をかく', new_board_path %>

<%= month_calendar events: @boards do |date, boards| %>
  <%= date.day %>

  <% boards.each do |board| %>
    <div>
      <%= link_to board.title, board %>
    </div>
  <% end %>
<% end %>
month_calendarの部分をweek_calendarにすると一週間分の表示になります。calendarのみだと4日分表示されました。
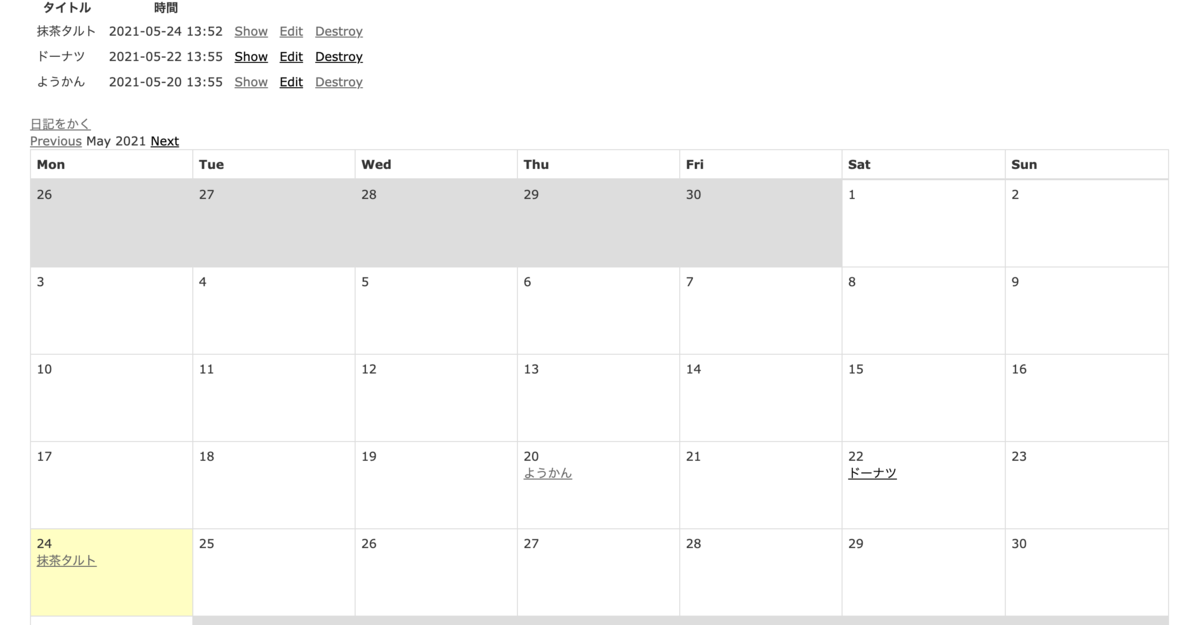
カレンダーの日付の欄に日記詳細ページへのリンクを表示しています。
今回はマイグレーションファイルでカラムを作成した時にt.datetime :start_timeでカラムの型をdatetimeにしました。なので時間まで表示されてしまったので、日記としては少し不自然になってしまいました。時間までのデータはいらないのでt.date :start_timeで作ったほうがよかったなあと思いました。
時間指定してLINEbotでメッセージを送信するpush機能を実装
LINEbotでメッセージおうむ返しアプリケーションを作成 - 学習記録
上記の記事の作業を事前に済ましている前提で説明していきます。時間指定をしたいのでRakeタスクとwheneverを使って実装していきたいと思います。
また以前書いたRakeタスクについての記事を参考にしました。
やることリスト
タスクファイルを作成
$ rails g task push_line
lib/tasksディレクトリ配下にpush_line.rakeファイルが作成されました。このファイルの中にpush機能の内容などを書いていきます。今回はtaskを2つ作成しました。
namespace :push_line do
  desc "朝メッセージを送る"
  task push_line_message_morning: :environment do
    message = {
      type: 'text',
      text: 'あれ?まだ寝てるのかな?太陽の光を浴びてスッキリ起きよう?'
    }
    client = Line::Bot::Client.new { |config|
      config.channel_secret = ENV["LINE_CHANNEL_SECRET"]
      config.channel_token = ENV["LINE_CHANNEL_TOKEN"]
    }
    response = client.push_message(ENV["LINE_USER_ID"], message)
    p response
  end

  desc "夜メッセージを送る"
  task push_line_message_night: :environment do
    message = {
      type: 'text',
      text: 'もうすぐ日付超えちゃうよ〜。。今日もお疲れ様です。毎日頑張ってる君はえらい!おやすみなさい。'
    }
    client = Line::Bot::Client.new { |config|
      config.channel_secret = ENV["LINE_CHANNEL_SECRET"]
      config.channel_token = ENV["LINE_CHANNEL_TOKEN"]
    }
    response = client.push_message(ENV["LINE_USER_ID"], message)
    p response
  end
end
response = client.push_message(ENV["LINE_USER_ID"], message)このコードはメッセージを送信する相手を指定しています。Herokuなどにあげてデプロイする予定はないので、.envファイルに自分のユーザーIDを管理しておきました。
LINE_USER_ID=Your user IDを貼り付ける
※Your user IDはLINE Developersの指定チャンネル内、Basic settingに記載されています。
wheneverを使って時間指定の処理を実装
まず最初にwheneverのgemを追加して、bundle installをします。
gem 'whenever', require: false
時間指定をするためにschedule.rbファイルを作成します。このように出力され、configディレクトリ配下にschedule.rbファイルが作成されたら成功です。
$ bundle exec wheneverize .
>[add] writing `./config/schedule.rb'
>[done] wheneverized!
そして作成したschedule.rbファイルに設定を追記していきます。ここでcronを使うための設定などを行っています。
そして毎朝7時と深夜11時50分に各rakeタスクの指定した処理が走るように記載しています。
require File.expand_path(File.dirname(__FILE__) + "/environment")

rails_env = ENV['RAILS_ENV'] || :development

set :environment, rails_env

set :output, "#{Rails.root}/log/cron.log"

every 1.day, at: ['7:00 am'] do
  rake 'push_line:push_line_message_morning'
end

every 1.day, at: ['11:50 pm'] do
  rake 'push_line:push_line_message_night'
end
上記の設定を更新して実行できるようにするために下記のコマンドを打ちます。
$ bundle exec whenever --update-crontab
今回の実装では、友達登録してくれたユーザー全員にメッセージを自動送信するという実装は行っていません。
この実装で定義したrakeタスクはサーバーを起動していなくても設定時間になるとメッセージが送信されます。
LINEbotでメッセージおうむ返しアプリケーションを作成
LINEbotにチャットでテキストを送信すると、同じ内容のテキストを返信してくれるアプリケーションを作成していきます。
やることリスト
LINE Developersの登録と設定
LINE Developersで開発者として登録します。
新規プロバイダーを作成します。
チャンネルを作成します。
Ngrokをインストールしてローカル開発環境を構築
Ngrokとは、手元のPC内に立ち上げたローカルサーバを簡単に外部に公開することができるサービスです。LINE Bot開発で、ちょっとした動作確認行うために、毎回Herokuなどにデプロイしてログを確認するという作業をしなくてもいいので作業効率が上がります。
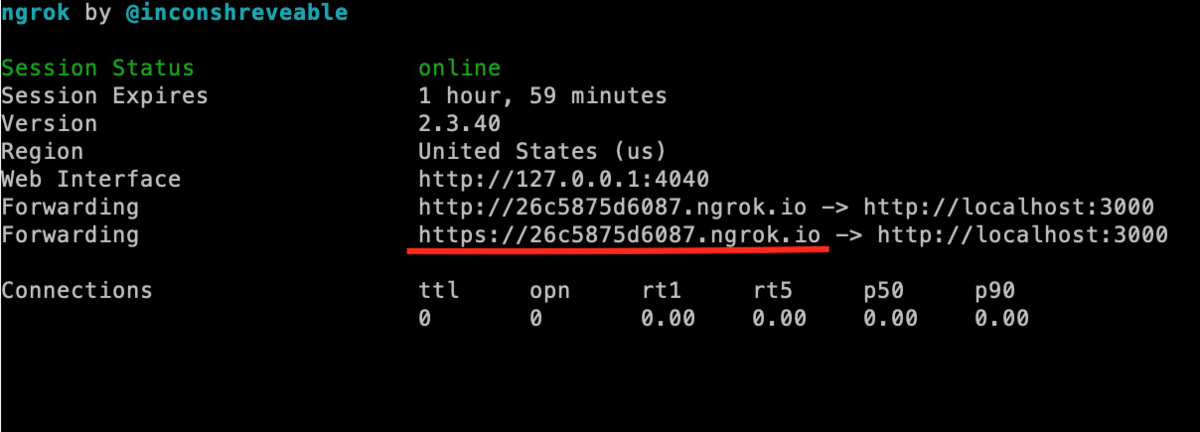
$ brew install ngrok
$ ngrok —version
$ ngrok http 3000
※サーバーを起動した時に発行される赤線を引いた下記のURLが後々必要になります。
LINEbotの実装
- Railsアプリケーションを作成します。
$ rails new hoge
- LINEbotを使うためのgemを追加して
bundle installします。
gem 'line-bot-api'
- コントローラを作成します。
$ rails g controller linebot
※コントローラは公式のコードやQiitaの記事を参考にしました。
GitHub - line/line-bot-sdk-ruby: LINE Messaging API SDK for Ruby
Rails+heroku+LINE Messager APIで秘書的なLINEbotを作ってみた(ゴミ出しの通知編) - Qiita
class LinebotController < ApplicationController
     require 'line/bot'

    # callbackアクションのCSRFトークン認証を無効
    protect_from_forgery :except => [:callback]

    def client
      @client ||= Line::Bot::Client.new { |config|
        config.channel_secret = ENV["LINE_CHANNEL_SECRET"]
        config.channel_token = ENV["LINE_CHANNEL_TOKEN"]
       }
    end

    def callback
      body = request.body.read

      signature = request.env['HTTP_X_LINE_SIGNATURE']
      unless client.validate_signature(body, signature)
        head :bad_request
      end

      events = client.parse_events_from(body)

      events.each { |event|
        case event
        when Line::Bot::Event::Message
          case event.type
          when Line::Bot::Event::MessageType::Text
            message = {
              type: 'text',
              text: event.message['text']
            }
            client.reply_message(event['replyToken'], message)
          end
        end
      }

      head :ok
   end
end
- linebotコントローラのcallbackメソッドを出力するためにルーティングを設定します。
Rails.application.routes.draw do
   post '/callback', to: 'linebot#callback'
end
dotenvを使ってenvファイル環境変数を設定
- Gemfileにdotenvを追加して
bundle installします。
gem 'dotenv-rails'
dotenvとは環境変数を管理する事が出来るgemです。 アプリケーションの中で「DBの情報」や「サーバーの情報」「外部APIの連携情報」など第三者に見せたくない機密情報をコードとは別に環境変数として情報を保存します。保存先は.envファイル という機密情報をまとめたファイルを作成し、情報を管理します。.envファイル はgitにそのまま載せると機密情報がgitに乗ってしまうため、 .gitignore に .envファイル を追加することで情報漏洩を回避します。
- アプリケーションのルート直下にenvファイルを作成します。
$ touch .env
- 作成したファイルの中に
LINE_CHANNEL_SECRETとLINE_CHANNEL_TOKENを管理します。
LINE_CHANNEL_SECRET=Channel secretを貼り付ける
LINE_CHANNEL_TOKEN=Channel access tokenを貼り付ける
※Channel secretはLINE Developersの指定チャンネル内、Basic settingに記載されています。
※Channel access tokenはLINE Developersの指定チャンネル内、Messaging APIに記載されています。
- gitignoreに.envファイルを追加します
/.env
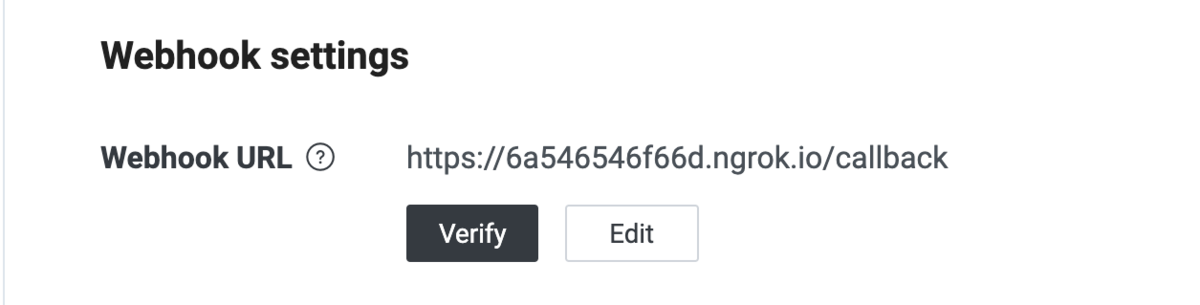
Webhook URLを設定
- ngrokでサーバーを起動した時に発行されたURLに/callbackをつけて、LINE Developers内のMessaging APIのWebhook settingsに設定します。
これで作成したLINEbotをQRコードで追加することで、チャットをおうむ返しするアプリケーションが完成しました。
ngrokでサーバーを起動してローカル環境でアプリケーションを動かしているので、ngrokのセッションが切れたらその都度Webhook URLを変更しなくてはいけません。
nil? blank? empty?の検証
nil? blank? empty?の使い分け
似てるけど全然違う、使い分けが曖昧だったのでまとめてみます。0、nil、""(空文字)、" "(空白)、{}(空ハッシュ)、[](空配列)を例にして検証してみます。
nil?
nilの場合のみtrueになります。
それ以外はfalseです。
pry(main)> 0.nil?
=> false
pry(main)> nil.nil?
=> true
pry(main)> "".nil?
=> false
pry(main)> " ".nil?
=> false
pry(main)> {}.nil?
=> false
pry(main)> [].nil?
=> false
empty?
空の文字列、配列、ハッシュの場合trueになります。
空白の時はfalseになります。
nil、0にはエラーが発生します。
pry(main)> 0.empty?
NoMethodError: undefined method `empty?' for 0:Integer
pry(main)> nil.empty?
NoMethodError: undefined method `empty?' for nil:NilClass
pry(main)> "".empty?
=> true
pry(main)> " ".empty?
=> false
pry(main)> {}.empty?
=> true
pry(main)> [].empty?
=> true
blank?
0の時はfalseになります。
その他は全てtrueになります。
 pry(main)> 0.blank?
=> false
pry(main)> nil.blank?
=> true
pry(main)> "".blank?
=> true
pry(main)> " ".blank?
=> true
pry(main)> {}.blank?
=> true
pry(main)> [].blank?
=> true
blank?の反対の使い方ができるpresent?というメソッドも紹介しておきます。
present?
!blank?と同じ意味です。
 pry(main)> 0.present?
=> true
pry(main)> nil.present?
=> false
pry(main)> "".present?
=> false
pry(main)> " ".present?
=> false
pry(main)> {}.present?
=> false
pry(main)> [].present?
=> false
nil? blank? empty?で0はどうなるのか
私は今回の実装でArticle.countで記事数が0ならという条件分岐を作ろう思っていました。しかし上記3つのメソッドを使おうとしてもinteger型の識別まではできませんでした。
最初はArticle.count == 0と実装していたのですが、他にも書き方としてzero?というメソッドもあるようです。
参考 : ruby: nil? empty? blank? どれも0をチェックしない - kinopyo blog
色々知識メモ
何時間後などの時間指定の方法
現在時から見て一時間後(未来)
DateTime.now.since(1.hour)
現在時から見て一時間前(過去)
DateTime.now.ago(1.hour)
content_tag
content_tagはビューでタグを記載するときに使います。セキュリティー面でとても良い書き方です。
content_tag(:i, nil, class: "fa fa-star")
=> <i class="fa fa-star"></i>
※ フォントアイコンを表示するときは、iタグで空要素を作って、class属性値にfaとアイコンごとのクラスをつけます。空文字だからnilを入れています。
改行させずにタグ同士を横並びに表示
この書き方だと星とハートのアイコンが縦に表示されます。
<i class="fa fa-star"></i>
<i class="fa fa-heart"></i>
これを横表記にしたいときは下記のようにdivタグで囲むように記載します。
<div>
  <i class="fa fa-star"></i>
  <i class="fa fa-heart"></i>
</div>
他にも横並びにすることができる書き方があります。
<i class="fa fa-star", style: 'display: inline'></i>
<i class="fa fa-heart", style: 'display: inline'></i>
参考 : 【CSS】displayの使い方を総まとめ!inlineやblockの違いは?
<div class="d-inline-flex">
  <i class="fa fa-star"></i>
  <i class="fa fa-heart"></i>
</div>
参考 : Bootstrap4に用意されているクラス【flex編】 | Webお役立ちネタ帳
I18n#lを使って時刻の表記をする
作成日時などの時刻表示を直感的にわかりやすくするために使います。
l(@tweet.created_at)
=> 2021/05/05 12:00:00
デフォルトで出力すると上記のような表記になります。もし違う書き方にしたいときはconfig/locals/ja.ymlファイルに定義します。
ja:
  time:
    formats:
      long: "%Y年%m月%d日(%a) %H時%M分%S秒 %z"
      short: "%y/%m/%d %H:%M"
l(@tweet.created_at, format: :short)
=> 2021/05/05 12:00
このようにカスタマイズすることもできます。